| 
| 
 
Shutters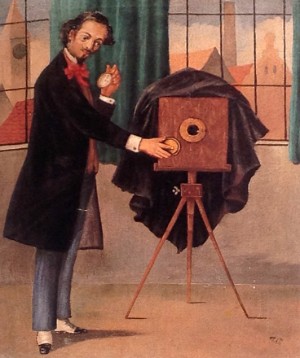
A photographic plate or film needs a certain amount of light to capture an image. In the early days of photography the light sensitive plates needed a lot more light than in later periods. Here is a table of average exposure times in bright weather: | Heliography landscape, 1826 | 8 hours | | Daguerreotype in 1839, 1840 | 15 to 30 minutes | | Daguerreotype from 1841 onwards | 10 to 90 seconds | | Calotype portraits (early 1840's) | 1 to 2 minutes | | Calotype larger landscapes (early 1840's) | 3 to 7 minutes | | Wet collodion large landscapes, 1851 | 30 to 120 seconds | | Ambrotype, 1851 | 2 to 20 seconds | | Gelatine emulsion, around 1878 | 1/25 to 4 seconds | | Gelatine emulsion, around 1900 | 1/250 to 1 second | (Table taken from Gernsheim. Exposure times varied greatly with season, subject, negative size, lenses) For a long period the photographer could do with taking off the lens cap, count the seconds and put it on again. See the gentleman in the drawing with a watch in his one hand and the lens cap in the other hand. 
During the last one or two decades of the 19th century hand held cameras appeared. They needed a quick acting shutter device to ensure that the pictures were not blurred by movement during the exposure. The trouble with shutters is that they have to be cocked and capped.
Cocking is necessary to provide the energy for the movement of the shutter when the photographer wants to take the picture. Often this was done by moving the shutter plate to its starting position by hand, i.e. by pushing a lever, turning a knob or pulling a string.
Capping is done to prevent that light passes the shutter when it is cocked. A simple way of doing this is by putting a cap on the lens, hence the word 'capping'. To create a large group of amateur photographers it was necessary to make photography as simple as possible. This could be done by eliminating a number of operations that the photographist had to think of. Cocking and capping were two of these. operations that made photography cumbersome. In the shutters below it is interesting to see how this eliminating was done. Each video shows the movement of the shutter in real time and in slow motion (17 times slower than in real time). Barrel shutter of the original Kodak of 1888. It had the advantage that it did not have to be capped when it was cocked. The barrel rotated always in the same direction and did not have to be pulled back to a starting position. Cocking was done by pulling the cord on top, which tensioned a spring. This spring drove the rotating barrel in which the lens was mounted stationary. The barrel had two openings that passed in front and behind the lens, letting the light pass in about 1/50 of a second. This barrel shutter had many parts and was expensive to produce. In the redesigned Kodak box of 1889 a sector shutter was used, which was less costly to make. | | Improved shutter of the first stringset Kodaks. It replaced the barrel shutter of the 1888 Kodak box camera. Here seen in a No. 2 Kodak. By pulling at a cord (string) the shutter plate and brass capping plate are pulled up simultaneously. The small brass capping plate covers the opening in the larger shutter plate, preventing that light passes through when the shutter is cocked. (This is not shown in the video as I don't want to pull the original 120 year old string to pieces.) On the right side a button is pressed to fire the shutter. The elongated opening in the shutter plate passes through the lens and lets the light pass in a fraction of a second. | | The Boston Camera Mfg. Co. introduced a true milestone camera in 1892: the Bull's-Eye. The shutter was very simple, with very few parts. Also it was easy to use, as it did not have to be capped. The shutter plate moved in two directions, the first exposure to one side, the second exposure back again. The arrows on the plate showed in what direction the button had to be pressed. The energy to move the shutter was stored in the spring, just before the plate moved. You can see in the video how it bends. At a point the shutter plate is freed and the spring pushes it forward. Notice that after the exposure, the shutter plate is engaged again by a pin on the long horizontal lever. | | Shutter of the 1897 Falcon Kodak that was also used on the 1895 Bullet and the 1895 Pocket Kodak. This was thought to be a simple shutter, with only one button for: - cocking the shutter
- firing the shutter
- taking time exposures
First the shutter is cocked by pressing the knob on top of the camera sideways. You can see how the capping plate blocks the opening in the shutter plate to prevent light from passing through.
By pressing down the same button on top, the shutter is fired. The capping plate moves with the shutter plate to its original position but does not cap the opening.
By turning the knob one quarter and then pressing it, one could take time exposures. The plate stopped in the center, when the opening was aligned with the lens. This shutter was abandoned after only a short time and replaced by a more simple rotating disc shutter. | | This simple but effective shutter was used on many cheap and easy to use Kodak box cameras from 1895 until 1913.
Here you see it in a rare 1899 No. 4 Zenith Kodak. The shutter consist of af a rotating disc that moves to and fro. The disc rotates in one direction for the first picture and in the other direction for a second picture.
The shutter is driven by a spring at the moment the picture is taken. Notches on the edge of the disc regulate the moment on which the energy of the spring is released and the shutter fires. Capping is not necessary as the disc does not have to be pulled back to a starting position. The energy for the movement is provided at the moment the photographer presses the button, a split second before the picture is taken. | | Shutter of the No. 4 Panoram Kodak that was also used in the No. 1 and No. 3A Panoram. The camera in the video dates from 1914. I show this shutter because it is so unusual. The remarkable thing is that the lens swings in an arc of about 120 degrees. Cocking is done by rotating a lever on top. This stores the energy in a spring. On pressing the button the lens rotates in an arc. On the inside a flat sort of cone is attached to the lens and this cone projects a narrow vertical band of light on the film, which is in a curved position. This way the film is exposed from one end to the other. There is no shutter that cuts off the light. At the end of the rotation of the lens the light is just projected in a sort of black chamber. | | |
 |
| | |
|